
In today’s fashion, footwear, and home textile industries, digital fabrics are changing how products are designed, sampled, and produced. Understanding texture maps has become essential knowledge as brands shift toward digital sampling and 3D product development.
Texture maps are the building blocks that allow digital fabrics to look realistic, from the subtle sheen of silk to the coarse weave of denim. Without them, 3D fabrics would appear flat and unconvincing.
This article explains the different texture maps used in creating realistic digital materials for fashion, footwear, and home textiles. Whether you’re involved in design, product development, or digital transformation, this knowledge will help you navigate the increasingly digital landscape of textile visualization.
Now that we understand the importance of digital fabrics, let’s explore the key technology that makes them possible: texture maps.
Quick Summary:
Texture maps are essential tools that bring 3D digital fabrics to life by controlling color, texture, transparency, and light interaction. This guide covers the 8 main texture map types used in fashion, footwear, and home textiles, explains why they matter, and provides beginner tips for creating digital materials.
Texture maps are specialized 2D images that wrap around 3D models to create realistic material appearances. Think of them as layers of information that define how a digital fabric looks, feels, and interacts with light.
In the physical world, a fabric’s appearance comes from its weave structure, fiber properties, color, and how it interacts with light. In the digital realm, texture maps replicate these qualities by providing specific information to rendering software.
Without texture maps, digital fabrics would look like plastic – flat, uniform, and unconvincing. With properly created texture maps, even a simple 3D model can be transformed into a photorealistic digital twin of physical fabric, complete with weave patterns, subtle sheen, and natural folds.
The fashion and textile industries are embracing digital workflows for several compelling reasons:
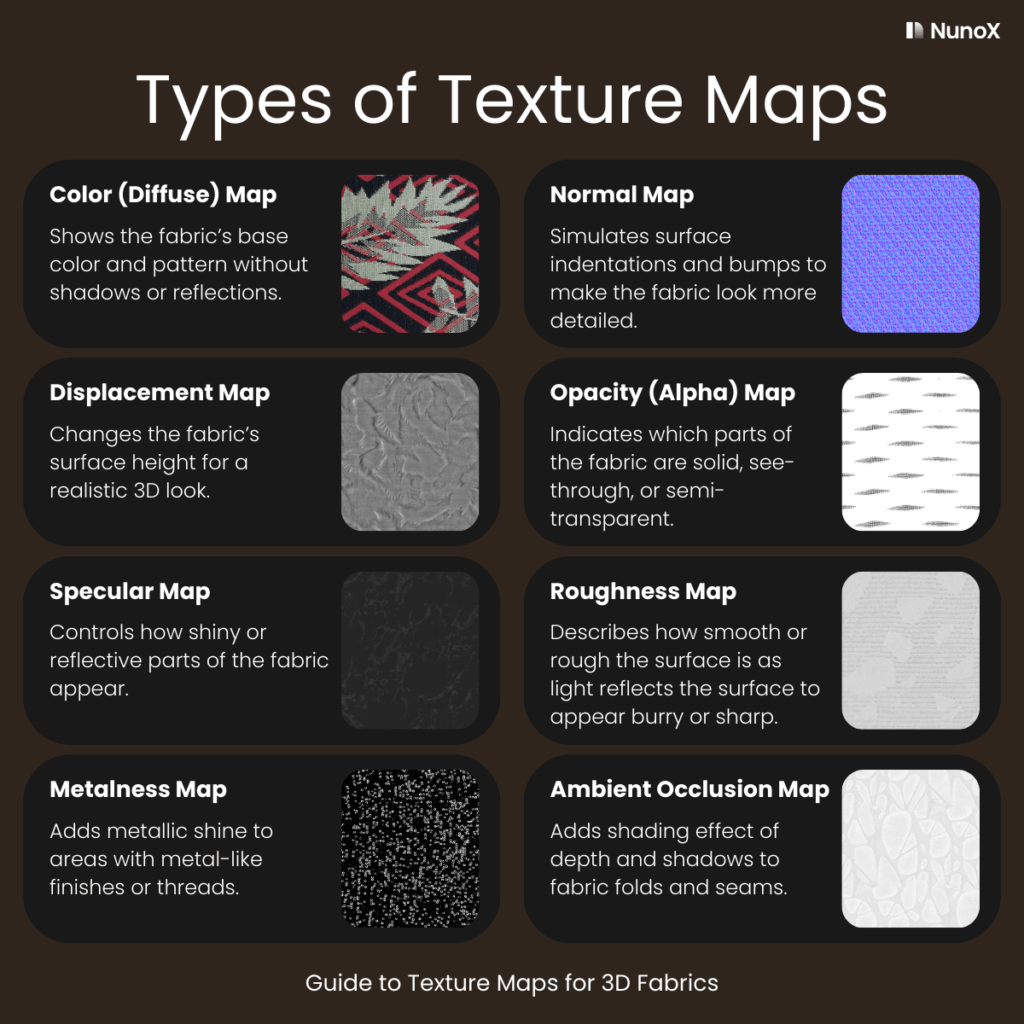
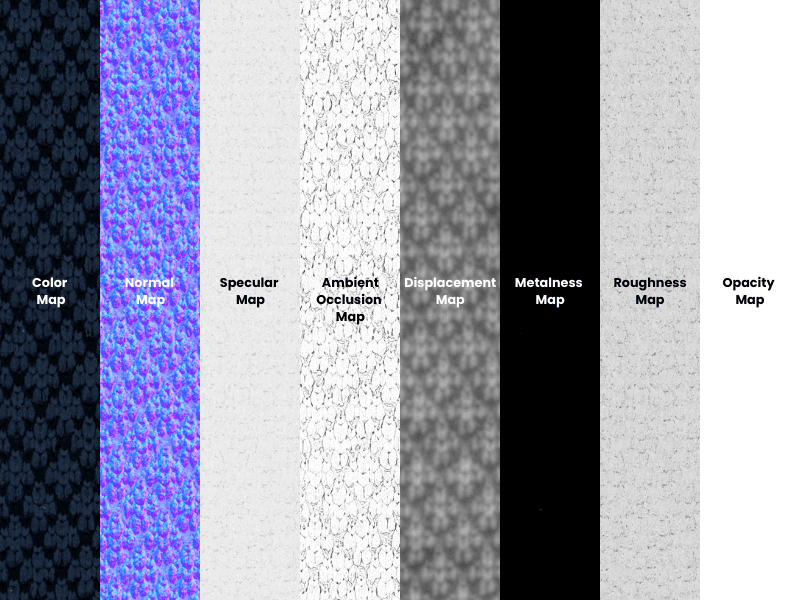
The Color Map shows the basic color and pattern of your fabric without any lighting effects. It’s like a flat photograph of your fabric under perfect, even lighting. It’s the most fundamental texture map.
Purpose:
Example:
Tip:
Also Known As: Diffuse Map, Albedo Map, Base Color Map
The Normal Map creates the illusion of fabric texture without actually changing the 3D shape. This map appears bluish-purple because it encodes surface direction information as RGB color values.
Purpose:
Why Performance Matters:
Example:
Tip:
Also Known As: Bump Direction Map
The Displacement Map physically alters the surface geometry of the 3D model to create actual raised and lowered areas, unlike Normal Maps, which only simulate texture. These maps alter the geometry based on grayscale values, with white areas pushing the surface up and black areas pushing it down.
Purpose:
Example:
Tip:
Also Known As: Height Map, Bump Map
The Roughness Map determines how smooth or rough a surface appears, affecting how sharply or diffusely it reflects light.
Purpose:
Example:
Tip:
The Opacity Map controls which parts of your fabric are see-through and which parts are solid, using grayscale values where white is solid and black is transparent.
Purpose:
Example:
Tip:
Also Known As: Alpha Map, Transparency Map
The Specular Map controls which parts of your fabric appear shiny and reflective and which parts appear matte. This is vital for mixed-material garments to ensure the fabric’s natural finish is accurately represented in a digital render.
Purpose:
Example:
Tip:
Also Known As: Gloss Map, Reflection Map
The Metalness Map identifies which parts of your fabric should have metallic properties, using black and white values where white represents metal areas. This technique allows metallic details, such as grommets, embroidery, and hardware, to reflect light correctly without making the entire fabric appear metallic.
Purpose:
Example:
Tip:
Also Known As: Metallic Map

The Ambient Occlusion (AO) Map adds subtle shadows in areas where light has difficulty reaching, like folds, seams, and crevices. AO maps improve the realism of layered and structured textiles, preventing materials from looking unnaturally flat.
Purpose:
Example:
Tip:
Also Known As: AO Map, Occlusion Map
| Map Type | Primary Function | Visual Appearance | Used For | Alternative Names |
|---|---|---|---|---|
| Color Map | Defines base color and pattern | Realistic image of fabric | Basic color and pattern representation | Diffuse Map, Albedo Map, Base Color Map |
| Normal Map | Creates the illusion of surface detail | Bluish-purple image with encoded directional data | Fabric weaves, knit patterns, embroidery details | Bump Direction Map |
| Displacement Map | Physically alters geometry for depth | Grayscale image (white = raised, black = lowered) | Quilting, heavy embroidery, pleating, substantial textures | Height Map, Bump Map |
| Opacity Map | Controls transparency | Grayscale image (white = solid, black = transparent) | Lace, mesh, sheer fabrics, perforated materials | Alpha Map, Transparency Map |
| Specular Map | Determines shininess/reflectivity | Grayscale image (white = shiny, black = matte) | Differentiate satin from cotton, leather from suede | Gloss Map, Reflection Map |
| Roughness Map | Controls surface texture smoothness | Grayscale image (black = smooth, white = rough) | Surface quality, micro-texture, finish variations | — |
| Metalness Map | Defines metallic properties | Black and white image (white = metal, black = non-metal) | Metal buttons, zippers, metallic threads, sequins | Metallic Map |
| Ambient Occlusion Map | Adds natural shadows in recesses | Grayscale image (white = lit, black = shadowed) | Fabric folds, seams, crevices, draped details | AO Map, Occlusion Map |
Creating texture maps for digital fabrics typically follows two major steps:
There are several ways to capture fabric details:
Each method varies in speed, accuracy, and scalability depending on the project’s needs.
Once the fabric is captured, the next step is generating texture maps:
Additionally, some modern platforms, like NunoX NX Lite, offer software using AI to generate texture maps from fabric images, offering another way to digitize materials quickly without needing full scanning hardware.
As the industry continues to embrace digital workflows, the ability to work with texture maps becomes increasingly valuable. Whether you’re a designer looking to reduce physical sampling, a product developer aiming to accelerate time-to-market, or a textile professional interested in sustainable practices, texture maps are the building blocks of digital material creation.
The good news is that while texture maps themselves are technical in nature, creating them doesn’t have to be. Modern automated scanning solutions like the NunoX Premium Scanner have made digital material creation accessible to professionals without specialized technical backgrounds. What once required hours of manual work can now be accomplished in minutes with greater accuracy and consistency.
Have more questions about digital materials or texture maps?
Check out the FAQ section below for quick answers to common questions.
No. Start with Color, Normal, and Roughness Maps for most fabrics. Add others as needed for specific properties like transparency (Opacity) or metallic elements (Metalness).
Yes. Software like Substance Designer and NunoX NX Lite can help generate texture maps from fabric photographs. For best results, capture the fabric under even lighting without shadows.For material digitization scanners, consider from NunoX Premium Scanner or Vizoo xTex.
Industry-standard programs include CLO3D, Browzwear VStitcher, Marvelous Designer, and Optitex. For digital material creation specifically, consider Substance Designer or Adobe Photoshop.
Texture maps control appearance, while physical properties (weight, bend, stretch) are typically set separately in your 3D clothing software. However, some displacement information can inform physics simulation.
Physically Based Rendering (PBR) uses material maps that mimic real-world physical properties (Metalness, Roughness) rather than artificial parameters. This creates more consistent, realistic results across different lighting conditions.